|
|
Post by tiamat on May 6, 2012 15:38:16 GMT -5
>well, i'm not sure how to do a step-by-step tutorial, but i'll prolly just put up a pic and tell you what's different from the one before it. for this first one, it's just the Tyrannofex model, sans weapon arms and toxin sacs, i'll paint those seperately, and the arms will be magnetized. i had to call GW to get a base for this monster, for some reason they forgot to put one in the box set. no big deal, it came in the post a couple days after i started building. so, once i had my build complete, i sprayed the whole model, and the separate parts, with a black undercoat. for the record, this whole tutorial is going to be done using the older paint names, as i don't know the new ones yet. i'm also going to be a cheapskate, which is nothing new. the black spray i use comes from WalMart, with the Color Place name on it. it's 88 cents a can before tax (prices may vary depending on where you are), and it works pretty well. it's very matte, and paints (particularly foundation paints) stick rather well to it. once that dried, in about 5 minutes, i simply slapped a cheap WalMart acrylic (i forget the brand, i'll correct that later) called Violet Pansy (go ahead and giggle, i did as well.) on all the creature's skin. yes, i used a large brush, and my undercoats are almost always pretty sloppy. it'll get cleaned up in later steps. on top of that is a very messy wash of 50:50 Purple Ink (very old bottle) and Leviathan Purple wash (slightly newer). had to let that step dry overnight, as this model has some very large, very deep crevices.< Attachments:
|
|
|
|
Post by tiamat on May 6, 2012 15:41:29 GMT -5
>correction - this picture has the wash on it. my bad. after apply and drying the wash, drybrushing commenced. you can see it on this picture. three consecutive layers, all of which are my own mixes. starts as Violet Pansy for the first layer, a more Mauve-ish color for the next, and a very light, almost white lilac for the last (highlight) drybrush layer. the first two layers are fairly heavy, but the third is quite light, applied only to the most prominent edges. another closeup of this step follows.< Attachments:
|
|
|
|
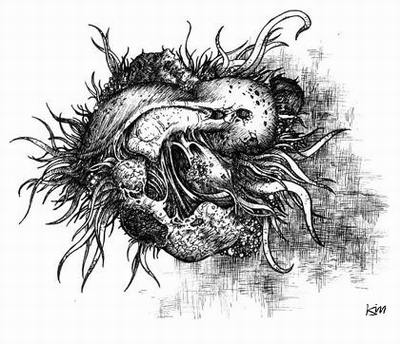
Post by tiamat on May 6, 2012 15:50:38 GMT -5
>the head. creepy!< Attachments:
|
|
|
|
Post by tiamat on May 6, 2012 15:51:57 GMT -5
>another closeup from the other side.< Attachments:
|
|
|
|
Post by tiamat on May 6, 2012 15:54:59 GMT -5
>while that was going on, i did the same to both parts of the Rupture Cannon. i LOVE this weapon. i'm using about the same color scheme i used for the Hive Guards' Impaler Cannons, but with a brighter green (i call it Gir Green) for the extreme highlights at the end. over the black undercoat, i applied Knarloc Green foundation paint as the basecoat. on top of that is Camo Green, applied directly, not drybrushed. a heavy wash of Thraka Green went on top of that and i set them aside to dry. oh, before i started the green parts, i carved out the arm joints and fitted the magnets on. mine are 1/4"x1/16" rare earth magnets. i also have the Fleshborer Hive arms started, but i haven't taken any pics of them yet. more pics will folly next few days or so. to be continued...< Attachments:
|
|
|
|
Post by tiamat on May 6, 2012 16:05:23 GMT -5
>other side. i also realized these two pics don't have the Gir Green edge highlights yet. next few steps will have the bone bits and some of the detail work, stay tuned.< Attachments:
|
|
|
|
Post by JohnnyDangerous on May 7, 2012 5:27:07 GMT -5
Now you can put that pistol in your boot instead of a knife... Surprise its a bioweapon!(Oh the look on there face as they were devoured buy tiny hungry nids, priceless) Did they issue those to all the Coasties? Hey, I have seen X-Files...
But seriously.... is there any way to magnetize the bottom of the torso? or has it been designed so only one variant can be made from the model? I would like to buy the kit... but Id rather convert carnies... like I already started...
|
|
|
|
Post by tiamat on May 13, 2012 13:10:39 GMT -5
>johnny, i'm not sure if that first part made any sense at all. as for the magnetizing, you'd need some SERIOUSLY tiny magnets. see the three talon-looking things along each sides of the beast's ribcage? those are the contact points for the spawning sacs. i suppose if you were to magnetize each talon, as well as the sac, it would be do-able. the rest would be a cakewalk, magnetize the head, other weps, etc. but the ribcage would require some very steady and tiny magnet works. to continue, not much new here. all that's been changed is i've undercoated the bone bits (well, most of them in this pic anyways) with good old...wow, i'm completely blanking on the color. Snakebite Leather? maybe? well, it's brown anyways. if you'd rather use a foundation paint, i recommend Khemri Brown or it's modern equivalent. i think on my nid's i burned thru a bottle of Khemri in about 2 months. it's that useful. Golgotha's tongue has been undercoated Mechrite Red. ultimately, the tongue will fade from a VERY dark red (Scab Red with a Chestnut Wash) to a VERY light pink - nearly white - at the tonguetip. couple more pics of this step follow, then on to the update to the Rupture Cannon - the weapons are so much fun...< Attachments:
|
|
|
|
Post by tiamat on May 13, 2012 13:12:46 GMT -5
>other side.< Attachments:
|
|
|
|
Post by tiamat on May 13, 2012 13:16:09 GMT -5
>closeup. i forgot to add, the eyes are undercoated with Orkhide Shade. dunno the new paint name.< Attachments:
|
|
|
|
Post by tiamat on May 13, 2012 13:17:50 GMT -5
>teeth were a pain in the butt to undercoat, but i'm pretty happy with them.< Attachments:
|
|
|
|
Post by tiamat on May 13, 2012 13:24:35 GMT -5
>okay. at this point, all the green on the Rupture Cannon is painted, INCLUDING the Gir Green. all the bits of bone are undercoated in Snakebite Leather, covered with Bleached Bone, and washed with watered-down Flesh Wash. i call it Bone Wash - i always keep a bottle of watery Flesh Wash, because SOMEHOW, every model i paint has bone coloration on it somewhere. i've decided for all the weapon's various "blisters/eyes," i'm going with yellow. i HATE painting yellow. started off with a Fortress Grey u/c. that color is GREAT as an undercoat, especially for yellows and white. the starting yellow here is a very old bottle of Sunburst Yellow, watered-down for smoothness' sake. it still looks like sh*t, tho. i'll have pics of that step on here soon.< Attachments:
|
|
|
|
Post by tiamat on May 13, 2012 13:26:41 GMT -5
>there's the yellow. it's nowhere near done, obviously. the turtleshell-looking thing i'm gonna paint the same way i paint my Adrenaline Sacs, a weird pink/orange blend. i was inspired by some photos i found of some barrier reef corals a while back. i get a lot of my paint schemes this way, in case any of you ever wondered. the ocean is an awfully colorful place. phosphoresant algae at night is particularly cool.< Attachments:
|
|
|
|
Post by tiamat on May 13, 2012 13:32:41 GMT -5
>action shot, heehee!< Attachments:
|
|
|
|
Post by tiamat on May 13, 2012 13:36:43 GMT -5
>here's one of the Fleshborer Hives. i think i'm pretty much going to use the same scheme as GW on the Hive surfaces themselves. i just have to figure out exactly what they did. a front view follows.< Attachments:
|
|